

how to install crown molding on kitchen cabinets
So you've reached the end of your cabinet installation and are looking for the best method of installing crown on cabinets.
Fortunately, anyone comfortable with a miter saw and brad nailer anyone can install crown molding.
But the bad news is it takes some practice, careful measurements, and perhaps an extra stick or two of crown molding.
What makes installing crown molding so hard? Well, consider this:
- Complex angles for interior and exterior corners.
- Long, flexible strips make holding and nailing difficult.
- Measuring crown molding is tricky.
- Crown molding is expensive. Often $5-8 or more per foot.
In this article I'll review recommended tools and techniques to install crown molding and help improve your final install. Oh, and I'll conclude with a trick I've had in my toolbox for years to hide any imperfections.
Top Picks:
- Crown Angle Jig: General Tools Crown Tool will eliminate compound cuts and make installation MUCH easier. And, reduce waste (easily paying for itself).
- Make imperfections disappear: Color Putty will hide all gaps and nail holes, and can be custom blended.
Steps to install crown molding
While installing crown on cabinets isn't as simple as installing trim around doors and windows, these are the steps to install crown molding on cabinets:
- Find where the longest piece of crown will be installed and start there
- Try to install the next longest pieces first – any mistakes can be used elsewhere
- Determine the angles of both ends using a protractor
- Setup your miter saw and use a crown jig to layout each cut
- Cut the crown to length
- If installing by yourself, use crown hooks or a support jack to hold longer pieces in place
- Nail the crown to the cabinets
- Hide nail holes with color putty
Measuring crown molding
While this step might seem simple there are a few tricks:
- Installing crown on cabinets starts with the longest piece first. By doing this, if a piece is cut wrong you might be able to use another long piece as a backup.
- Use a 25′ or longer, wide rule tape measure to avoid the tape collapsing during measurements.
- Use a sharp pencil for making all marks.
Cutting crown molding
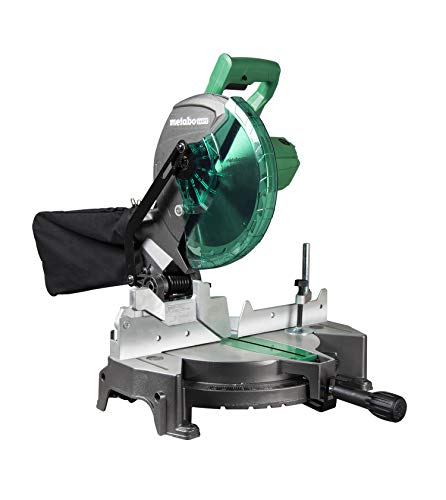
Metabo HPT 10-Inch Compound Miter Saw, Single…
- 10″ Compound Miter Saw
- MOTOR: 15 Amp motor delivers high power for the toughest of cuts generating a no-load speed of up to 5,000 RPM
- LIGHTWEIGHT: Only 24.2 lbs. to facilitate maneuverability and portability
Last update on 2021-11-11 at 07:03 / Affiliate links / Images from Amazon Product Advertising API
You've heard the saying measure twice and cut once. Well, for crown molding it can pay to measure twice and cut four times. Why would you do that? I like to make the mark on the crown and then cut longer than needed, put the piece on the cabinet and then repeat until the fit is within 1/64″. It's a few more trips up the ladder but will reduce waste and cost of cutting a piece too short.
With complex corner cuts one of the riskiest cuts for DIY'ers, take a look at the Kreg crown molding jig to simplify the process. They include a cutting guide to simplify the job.
Nailing crown molding
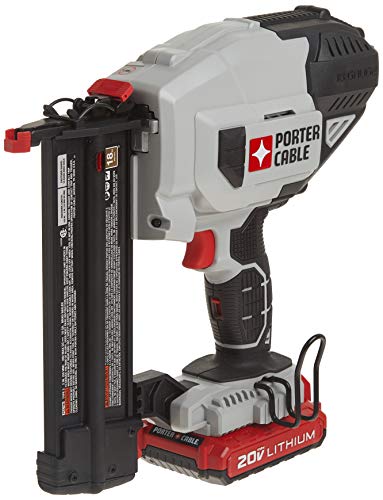
PORTER-CABLE 20V MAX Cordless Brad Nailer Kit with…
- 100% battery power of the cordless brand nailer eliminates need for compressor, hose or costly gas cartridges
- Motor design of 18 gauge brad nailer provides consistent firing power into various materials and climate conditions
- Multiple Tool-Free settings of the battery brad nailer provide ease of use
Last update on 2021-11-11 at 06:04 / Affiliate links / Images from Amazon Product Advertising API
Now that the piece is cut to length you can start nailing. If you are installing crown molding by yourself you'll want to consider a support system like the FastCap 3rd Hand support that works great for holding crown molding in place. And they are excellent for installing upper cabinets.
Hiding nail holes & gaps in crown molding

Last update on 2021-11-10 at 16:33 / Affiliate links / Images from Amazon Product Advertising API
Color putty is the secret weapon of any complete cabinet installation.
You'll need to hide not just nail holes in the crown molding but also any imperfections in your cuts, joints and toe kick.
I wouldn't tackle installing crown on cabinets without Color Putty on hand. You can custom mix colors to match any wood or grain pattern.
Summary
Hopefully this article helped you with the steps and tricks to install crown molding.
Be sure to check out our cabinet installation series for your next steps.
how to install crown molding on kitchen cabinets
Source: https://thehomewoodworker.com/installing-crown-on-cabinets/
Posted by: nicholscappereen.blogspot.com
0 Response to "how to install crown molding on kitchen cabinets"
Post a Comment